Traffic routing is the core mechanic in Rail Route.
You control the signals and switches on the rail map so trains are going to the right destination according to their timetable.
Routing can be either manual or automated.
| This article is a stub. You can help Rail Route Wiki by expanding it. |
Manual routing[ | ]
Manual routing is the basic routing mode. In Timetable and Rush Hour mode it's up to the author what type of signals you get to use where. In Endless mode you start out with manual signals but can upgrade as you progress.
When setting manual routes it's important to set every part of the route and only your focus can avoid collisions.
You can set the entire route for the train, or between one signal and the next to allow multiple trains to use the same line without colliding (assuming both are stopping at their own signals). It is up to you to find the best route for each train, making sure they go to the correct platform on time
Left click the switches to set them to the correct route and then set the signal to green by left clicking it. Once the route is green and the signal set the route will be locked in place and highlighted green. Right click the signal to unset the route and unlock the switches.
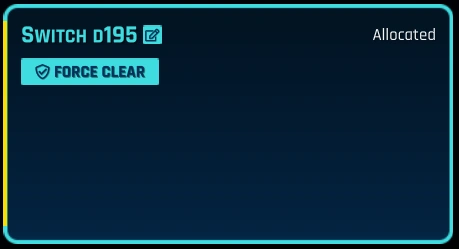
Force clear option box
NOTE : If you accidentally set a route and the train runs past the signal you can unlock switches and routes by holding CTRL on the keyboard and then clicking the switch or route length. You will then be given the option to FORCE CLEAR. Please also note that you need to do this for every section and switch on the route for the whole length to free up. You then need to manually set the route until the next signal or sensor. Be aware of trains coming in the opposite direction!
Automated routing[ | ]

Automated signals become available after you research Automatic Routing, sensors and other automatic routing options are available from the same Automation Upgrade screen
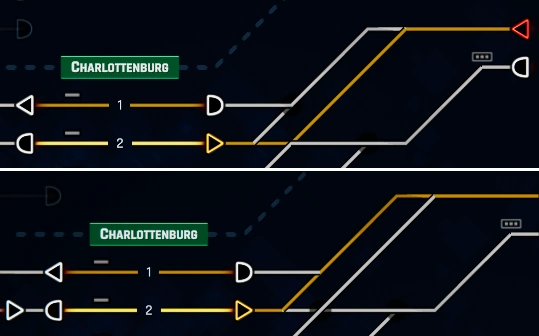
Left click the auto signal. All available "next hops" will be highlighted in orange; platforms, auto blocks, track before the next signal or coachyards. If the signal has a sensor before it the "next hop" will be the track between the sensor and the signal (for more on sensors see Automation).
Right click the signal to unset the route and allow other routes to be set
Look at the animation above. Clicking on Dejvice Platform 2 signal allows both outgoing tracks. Clicking on the right hand track signal from Dejvice will allow routing to Bubny Platforms 2 & 4. Why not 1 & 3? There's no route between the bottom track and those platforms...
Clicking on the destination track will tell the auto signal where to route. All of the switches are set accordingly and the path is created and set to green.
Collision avoidance is automatic because an auto sensor will only set the route if the whole track section is clear. It will not path if the section has another train in it.

Select your path using the mouse wheel
If there are multiple paths to a destination then the auto routing will select the shortest clear path available at the time it is set. So that's the shortest by distance, clear as in no trains in it and definitely no other signals between the start and end points! It could be that this fouls another train's path in the meantime, and you have the option to change the path.
Click the start point (signal) and then move the mouse to your desired end point (ie platform). The path will highlight orange but you can use the mousewheel to rotate through the possible options. When happy with that path click the platform to confirm the route.
NOTE : At time of writing this only sets ONCE, so isn't set for each run of the contract. Sensors set their routes automatically and there's no way of changing these.