Slousmistro (talk | contribs) mNo edit summary Tag: Visual edit |
m (→Switches: just moving the parenthetical) |
||
| Line 8: | Line 8: | ||
=== Switches === |
=== Switches === |
||
| ⚫ | |||
| − | (Also known as "Turnouts" or "Points") |
||
| ⚫ | |||
You can change a switch's direction by hovering over it and clicking on it. When you're hovering over a switch, a little dotted ring will surround it and the switch will highlight itself in a tan color. |
You can change a switch's direction by hovering over it and clicking on it. When you're hovering over a switch, a little dotted ring will surround it and the switch will highlight itself in a tan color. |
||
Revision as of 15:32, 17 January 2021
This article helps guide you through most things you'll need to know to get started with playing Rail Route. Basic concepts, such as routing trains, building track in freeplay, and managing contracts are briefly explained here.
Movement
The camera's controls are relatively straightforward. You can move the screen either by clicking and dragging with the left mouse or middle mouse buttons, or you can use W, S, A and D to move the camera up, down, left and right, respectively. You can scroll in and out with the mouse wheel.
Controlling Trains

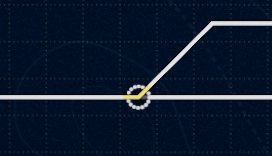
A train going through a junction of switches.
Switches
Switches (also known as "Turnouts" or "Points") are an essential part of Rail Route, and of Railroading in general. Here, trains can take different routes by "switching" what track they're on.
You can change a switch's direction by hovering over it and clicking on it. When you're hovering over a switch, a little dotted ring will surround it and the switch will highlight itself in a tan color.
Switches highlight themselves when you hover over them with the mouse. The switch on the right is highlighted.
Switches will automatically change when you're using Auto Signals, so don't worry about them then!
Manual Signals
Manual Signals look like half-circles. Trains will stop on the flat side unless the signal is set to green. You can set the signal to green by clicking on it - but first, make sure all the switches are set so the train will go to the right place!
Tracks in use are marked in green, but you can also use this green line to test out and see where your train will go before it makes it to the signal.
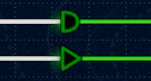
Manual (top) and Automated (bottom) signals.
Automated Signals
Automated Signals look like Triangles. Like Manual Signals, trains will stop on the flat side until the signal is set to green.
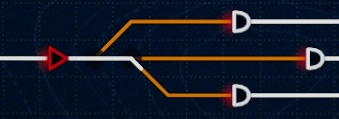
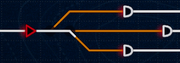
An Automated Signal when first selected. Note the tracks highlighted in orange, showing where the signal can route to.
Automated Signals don't need you to set all the switches ahead of it. Instead, you just click on the signal, then click on where you want the train to go. When you first click on the signal, a bunch of orange lines will pop up to where the signal can route to. Click on one, and the signal will route the switches ahead of it to line up to that track, then set the signal to green.
Automated Signals can be used with Automation, unlike Manual Signals.
Reversing Trains
When a train is stationary, you can right-click on it to reverse the direction it's going. However, if that train doesn't have a locomotive at the front, it will be limited to 30 kmph, no matter how fast the track speed is.
You can also reverse trains by hitting the "reverse" button when you have the train selected.
You can tell trains to reverse when they next stop by right-clicking on them when you have "Reverse once Stopped" unlocked in freeplay. This is already unlocked in puzzle levels.
You can also unlock "Stop and Reverse", which does what it says: It stops the train as soon as possible, then reverses it.

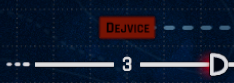
The red flash, indicating a train needs to enter.
Accepting Trains
Trains enter the map from the side. When a station flashes red, that means you need to accept a train. You can do this by clicking on the station, then clicking on the corresponding number that's flashing to send the train to the right track.
Freeplay Mechanics

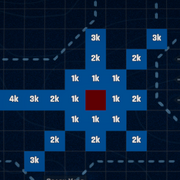
The red square is where the track was first built. The blue squares show where it can be built to.
Building
Building is fairly straightforward. When you click in an open spot, the game will show you where you can build to and how much it'll cost you.
Signals can only be built on straight track. Curves and switches do not work.
Autoblocks, Stations and Walls cannot be deleted or built through. Autoblocks and Stations can be built from the "buy" menu.
Sensors are a bit too complex for this guide, but can only be built on tiles that aren't switches, and tiles that don't have signals, tunnels, or other sensors on them. You can read more on Sensors in Automation.
Tunnels are far too complex to quickly explain how to build them in a sentence or two. You can learn more Here.

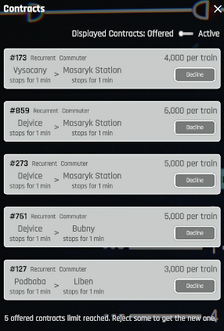
The contracts page with 5 contracts offered.
Contracts
In order to expand your system, you'll need to accept new contracts through the Contracts tab. But first, you have to unlock Contracts in the Research tab, under "Contracted Traffic".
Once you've unlocked the Contracts tab, check in on it from time to time. It will offer you new trains to try on your system. Just be careful to not add too many trains at one time!
If you don't like what a contract is offering, whether because it wouldn't give you enough money or you can't run trains to a station on its timetable, you can always hit "decline" to reject the contract. You can only have up to 5 contracts offered at a time, so this is very useful in the early game.
REMEMBER:
Commuter trains, after a short time playing, will be split into two contracts. You will have to accept the first half to send a train into the map, then once it's reached its final destination, wait for a new contract to be offered for its return trip off of the map. This can take a long time, and is quite risky, so be careful! If the first half of the train takes over an hour to find a contract, your could have some buggy interactions happen.

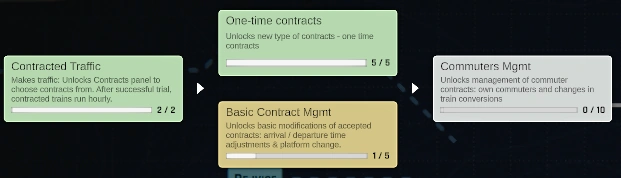
The research tab, with two completed items in green, one "in-progress" item in yellow, and one unresearched item in white.
Research
If you're playing in Freeplay, you will get upgrades to your system through the Research tab. This can be the ability to change contract timetables, run faster trains, automate your system, so on and so forth.
PLEASE NOTE: At this point in time, Research is getting a major overhaul. Once the game is released on Steam, how you get points will be very different, and will include a system involving one-time contracts.
When a train completes its contract, it will give you a point, unless:
- That train is a trial train
- That train had any delays in completing its timetable
The point will then go into the progress of the current upgrade you've selected.
If you haven't selected an upgrade to progress, the point will do nothing. Make sure to check in on your research progress every now and again! When you've completed a piece of research, the Research tab will flash yellow until you've opened it up, so don't stress too much over it. Just glance over to the lower-left every now and again to see if it's flashing.
Adding a Custom Level
Hopefully this will be integrated with the steam workshop eventually, but for now, instead you just have to copy and paste a level's code in order to add it. You can find codes in the Discord.
(I don't have a link to the discord server at this time. Sorry. I'll add one later. Probably.)