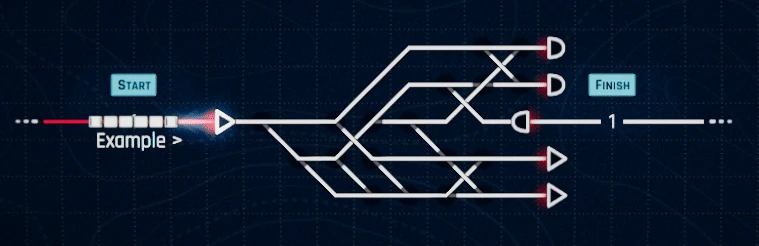
A player using an auto signal.
The more contracts and traffic you add to your system, the more you need to keep track of and manage. Automation allows the player to let sections of their map run hands-free, reducing their workload.
NOTE : See Routing for basics of signalling and setting routes
Routing Queue[ | ]
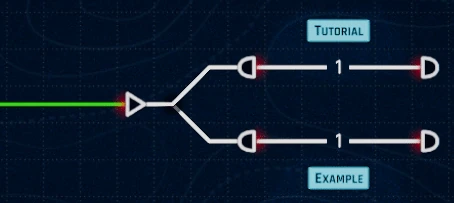
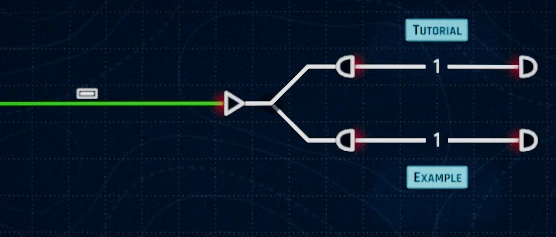
Queued routes. Note the number next to the signal once a second route has been added, and the fact that the signal immediately sets itself to the second route once the first train is clear of the switch.
Once unlocked via the research tree, Routing Queue allows Auto Signals to store routes as required by the incoming trains.
If any signal's current pathed route is in the way - including its own - the signal will queue the route and wait. A small number will be shown above the auto signal showing how many stored paths it has at that time.
Once the requested path is clear the signal will set the route and move the 1st stored path as current, setting and locking the switches and turning the route green.
Deleting queued routes
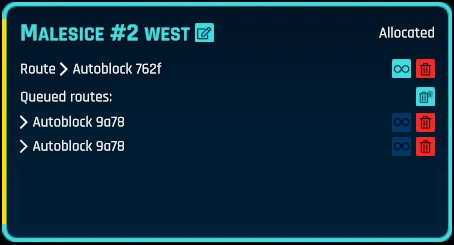
An auto signal's control panel, the top route is the current one, the two below are queued and will be routed when the line is clear
The simplest way to delete queued routes is to right click the signal. This will unset the currently set route, moving the 1st stored route to currently set etc...
For more control, and to see what routes are currently set, Hold CTRL and LEFT click the signal to be shown the signal control screen in the bottom right of the game screen
The routes queued are listed in order, with the topmost route being the first route to be set and the bottom listing being the last. If you are uncertain which queued route to remove, hover over the track name on the left. The game will highlight the route on the map, allowing you to figure out which route to delete.
To delete queued routes hit the garbage bin icon to the right.
You can clear all queued routes with the icon at the top of the list of queued routes that looks like a smaller trash can and a piece of paper.
Perpetual Routing[ | ]
Perpetual routing means that the auto signal will set the route again whenever the route is clear. You can use this whenever you want trains to always run from one signal to an autoblock, platform, etc, ie they never go anywhere else from that signal
The easiest way to set this is to click the signal and then hold shift when selecting the next step. You can also set the route, then hold CTRL and click the signal, then click the infinity sign next to the route you wish to keep set - handy if you want the first train to go one way, and everything after that another
A smaller infinity symbol will be shown above the signal controlling that section. to show it has a perpetual route set.
Perpetual routing will mean that the track section is ALWAYS locked once the track section is cleared. This means that to upgrade the line speed or to add, amend or bulldoze the line you need to cancel the route, which can be done by right clicking the signal. The route does NOT have to be set for this removal to work, such as a train being in a platform at the end of the perpetual route.
Auto-Accept[ | ]

The station control panel, including auto-accept
When selected, Auto accept will ensure trains will enter the map without your input.
If the required track is occupied the train will wait, leaving the station with the round "train waiting symbol" above
This can easily penalize you if you're not careful and not prepared. A train could get stuck waiting to enter the map, penalizing you for being late on the first platform. Don't let your stations get too clogged, and be cautious with your timetables!
Once unlocked, Auto-Accept is free to add to any number of stations. Select the station by clicking on it's name and set the auto accept checkbox in the options screen
BEWARE : When you first upgrade to Auto Accept all boundary stations will be set to accept trains automatically, BUT when you buy any boundary stations from then on they will NOT be set to auto-accept, you have to set this manually
NOTE : If you find yourself in a mess and every time you try to sort things out it clogs up again because of incoming trains, you can turn this off at the boundary station, giving you time and space to sort out the trains already on the map, and then accept the new trains manually, ensuring all of your routes are properly set up. Once you're good to go, set to auto again and watch them all flow through!
Sensors[ | ]
Sensors detect when a train runs over them and automatically set a route of their partnered auto signal to a specific track, depending on the train's next station listing. If that listing is not on the sensor's list of routes, the sensor will not activate, unless a track has been selected in the "others to" setting.
PLEASE NOTE

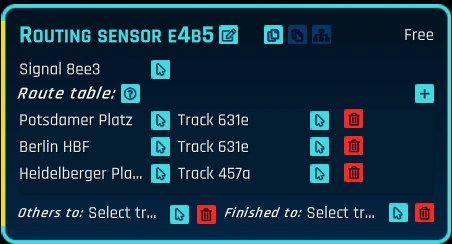
A routing sensor in action.
Multiple sensors can be hooked up to one signal, but each sensor can only pair up with one signal. So you can pair arrival and routing sensors to the same signal, or multiples of each type!
Routing and Arrival sensors trigger when trains run over them, so when trains are at speed having separation between the sensor and the signal means trains won't have to slow down while the route is set and the signal changed to green. Change too far in advance though and you'll block too much track and possibly slow down other trains! It's up to you to find the right balance for each situation on your route.
Routing Sensor[ | ]

Routing Sensor option box
Routing Sensors route a train depending on their next scheduled station in the case of freight and IC this includes stations marked as "passing".
Once a signal has been selected, you can select routes that signal is able to route to. To add a new route, click on the plus sign (+) on the right of the sensor menu, select the next station by clicking on its name, then select the track for the train to route to by clicking on the corresponding orange line.
If a route is altered in some way, e.g. a switch is added or a signal is put in the way the route, the sensor will not properly route to its destination. To fix this, either delete the route and re-make it from scratch, or click on the rightmost cursor icon on the corresponding route in the sensor menu, then select the new track.
If you alter a junction, check your sensors! Make sure they're routing correctly! Even the most experienced players can struggle with this!
Also remember that routing queue could be in effect, meaning that routes can stack from any signal. If you manually set a route, and the sensor adds a routing as well you could end up with a routing stuck in a signal and send the next train the wrong way. Take special care when setting routes manually such as operating a freight or contract test run!
NOTE : The next station on the train's route is what counts, not the ultimate destination, so if there are two routes possible to the ultimate destination, make sure the next step is set correctly else you could end up sending the train the wrong way
Others To:
This setting on a routing sensor will set a route for any other train passing the sensor where there is NOT an explicit instruction. Imagine a situation where if you go West you reach Swindon, East you reach Reading, but everywhere else you go to Oxford. SO you could set your sensor to have a specific route to Swindon, another to Reading but "for everything else, go to Oxford"
NOTE : Others To applies to ALL trains, heading in either direction! Be aware that you could end up with a train passing the wrong way and creating a pile up with auto routed trains going where the trains in front of them should have gone, or even a train going in the right direction (say to an adjacent station) and triggering multiple sensors and setting incorrect routes...
Finished To:
When a train has completed it's instructions it will be at one of two locations:
- A Boundary station. No further action is needed and the train will automatically follow the "three dots" off the map
- A station with a coach yard. This is where "Finished to" comes into play, click this and then click on your coach yard for trains to be automatically routed there when they're done
Arrival Sensor[ | ]


Arrival sensors will only route to one station, which can be troublesome when approaching a station if your train needs to go to a different track.
An Arrival Sensor fixes this as it will route to every platform that it can on the station it is linked to.
When you set the Arrival Sensor click on the sensor then click on the signal just before the station and then the station it links to. You will be given a list of available platforms that this sensor can route to.
You will still need to make sure there's tracks connecting every platform you wish to route to from that signal, but the sensor will handle the rest, it even updates automatically if you link track to more platforms!
Departure Sensor[ | ]
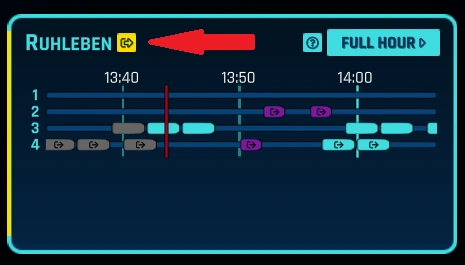
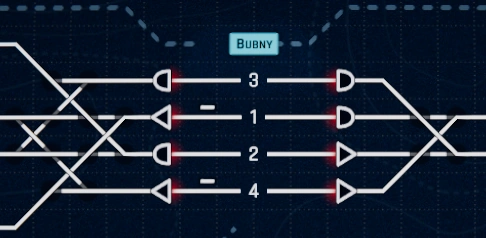
Bubny, with departure automation installed on tracks 1 and 4. The little line above tracks on the left indicates the presence of departure automation.
Departure Sensors are the only sensor that you can't freely build, they must be built on station platforms and will always be built on the left of the platform itself.
Departure sensors can only set auto signals but can access signals on both ends of the station. If one end of the station doesn't have an auto signal while the other does, only the side with the auto signal will be usable.
The most unique part of the sensor is it has the ability to reverse trains. If a departing train's route requires the train to reverse, it will automatically do so when it starts to leave the station. Be careful when routing freight or intercity trains as the loco may now be at the back (limiting the speed of the train!)
Trains passing through stations will also trigger departure sensors, BUT only once... If a train enters and then leaves the sensor will not trigger again if you reverse back into the station or "loop around".
To send a train into the local Yard use the "Finished to" setting at the bottom right of the sensor's settings screen and then click the yard. Platform sensors WILL work with trains leaving yards so long as they stopped in that yard
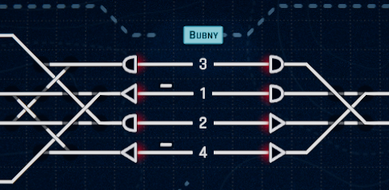
Automating a station "loop" with departure sensors
Station loops[ | ]
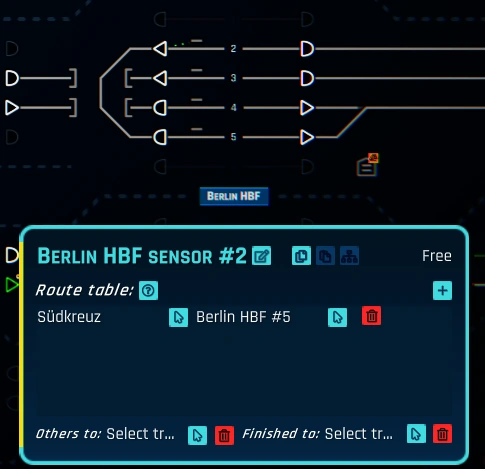
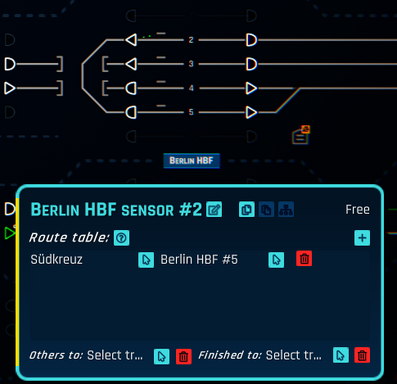
You can use departure sensors to create a loop around the station, required when sending IC trains back the way they came. Create the loop and in the departure sensor on the ARRIVAL platform set the next station command as usual, but in the "next hop" select the loop platform
The picture to the right shows the sensor on Berlin Hbf P2 which receives trains from Sudkreuz to the East, these trains then go round the loop and onto P5 to head back to Sudkreuz. The sensor on P2 to set to send all Sudkreuz trains to P5.